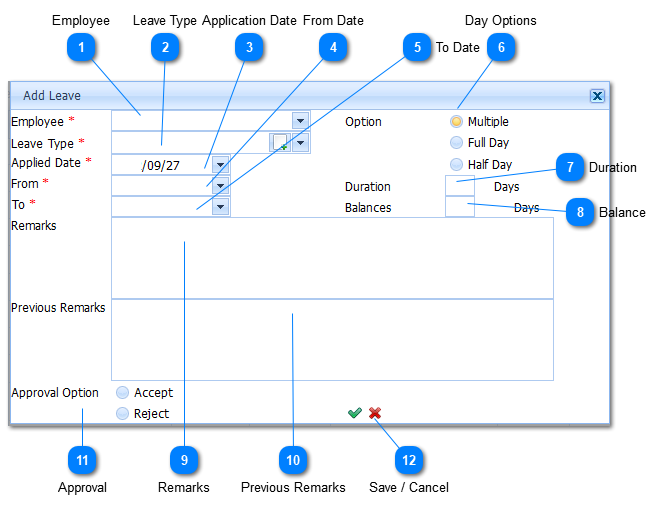
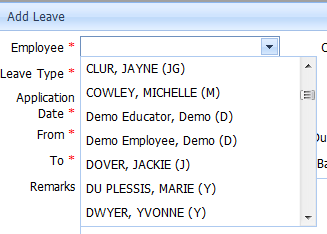
The Employee / Educator is a Required field (). The user selects the Employee / Educator by Left Clicking on the Drop Down List Box . When this is done a list of available Employees / Educators will be displayed.
Example :
The user needs to enter a Employee / Educator. Should the user not enter a Employee / Educator and attempts to Save () the information the system will give an indication () that this is compulsory information.
Select the applicable Employee / Educator by Left Clicking on it in the list.
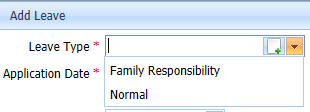
The Leave Type is a Required field (). The user selects the Leave Type by Left Clicking on the Drop Down List Box (). When this is done a list of available Leave Types will be displayed.
Example :
Select the applicable Leave Type by Left Clicking on it in the list. Should the user want to enter a New Leave Type it is done by Left Clicking on the AddButton (). When this is done the Add Leave Type Page will be displayed (Refer to Add Leave Type). Should the user not enter a Leave Type and attempts to Save () the information the system will give an indication () that this is compulsory information.
The Application Date is by default populated with the Current Date (Today).
The Application Date is a Required field (). The user needs to enter an Application Date Date. Should the user not enter an Application Date Date and attempts to Save () the information the system will give an indication () that this is compulsory information.
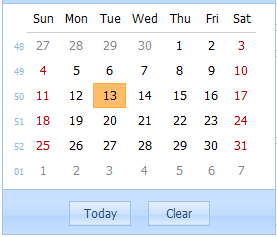
Make use of the Date Picker to enter the Application Date. The Date Picker is displayed by Left Clicking on the Drop Down Button (). When this is done the Date Picker will be displayed. Select the applicable date by Left Clicking on the date in the Calendar.
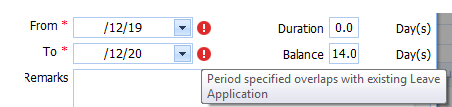
The From Date is a Required field (). The user needs to enter a From Date Date. Should the user not enter a From Date Date and attempts to Save () the information the system will give an indication () that this is compulsory information.
Make use of the Date Picker to enter the From Date. The Date Picker is displayed by Left Clicking on the Drop Down Button (). When this is done the Date Picker will be displayed. Select the applicable date by Left Clicking on the date in the Calendar.
The To Date is a Required field (). The user needs to enter a To Date Date. Should the user not enter a To Date Date and attempts to Save () the information the system will give an indication () that this is compulsory information.
Make use of the Date Picker to enter the To Date. The Date Picker is displayed by Left Clicking on the Drop Down Button (). When this is done the Date Picker will be displayed. Select the applicable date by Left Clicking on the date in the Calendar.
Note:
Should the user enter leave dates that overlap with leave that has already been submitted the system will display the following Error Message:
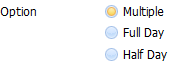
(i) Multiple - When the user makes use of the Date From to Date To Option that spans over multiple days, this option will automatically be selected.
(ii) 1 Day - When the use wants to register 1 days leave. As soon as the user selects this option by Left Clicking on it, the To Date will be Grayed out (Inactive). The user will not be able to specify a To Date.
(iii) 1/2 Day - When the user wants to register .5 days leave. As soon as the user selects this option by Left Clicking on it, the To Date will be Grayed out (Inactive). The user will not be able to specify a To Date.
The Employee / Employer must have an Available Leave Balance - the user needs setup initial leave balances on the Employee / Educator Profiles before the leave is captured. Should the Employee / Educator Leave balancesnot have been setup the leave balance will be negative and the system will display the following Error:
Example:
The system will automaticallycalculate the Leave Balance once leave has been entered .
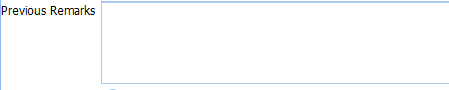
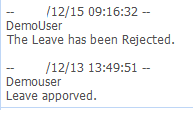
Should the user for example have initially approved leave and then for some reason Rejects the leave the history of this process will be displayed in the Previous Remarks.
When all information has been entered the Leave Application is saved by Left Clicking on the Save Button (). Should the user want to Cancel the Add Action, Left Click on the Cancel Button ().