Menu
Index

Daily Absenteeism

Daily Absenteeism
Note:
Should the user want to change From or To times for students that were captured for Absenteeism Types Early Leaving, Late Arrivals or Part Time it is done on the specific Student Profile.
1

Absent Type

1. Absent Type
The Absent Type is a Required field ().  The user selects the Absent Type by Left Clicking on the Drop Down List Box (). When this is done a list of available Absent Types will be displayed.
 
Example : 
 
Select the applicable Absent Type by Left Clicking on it in the list. Should the user not enter an Absent Type and attempts to Process the information by Left Clicking on the Next  Button (),  the system will give an indication () that this is compulsory information.
 
 
2

Absent Date

2. Absent Date
 
The Absent Date is a Required field ().  The user needs to Enter an Absent Date. Should the user not enter an Absent Date and attempts to Process the information by Left Clicking on the Next  Button (), the system will give an indication () that this is compulsory information.
 
Enter the Date for the Absenteeism. Make use of the Date Picker to do this. The Date Picker is displayed by Left Clicking on the Drop Down Button (). When this is done the Date Picker will be displayed. Select the applicable date by Left Clicking on the date in the Calendar.
 
3

From Time

3. From Time
Note:
Should the Absent Type be Absent or Absent - Official the From Time will be Grayed out (Inactive). The user will not be able to enter a From Time.
 
Note:
Should the Absent Type be Early-Leaving, Late - Arrivals or Part Time the From Time will  not be Grayed out (Active). The user will be able to enter a From Time.
 
The From Time is by default   populated as 07:30 AM. The user can change the From Time by entering it from the Keyboard or can Left Click on the Increase / Decrease Buttons  ().
 
Should the user enter a To Time which is smaller than the From Time the the System will give an indication of this:
 
4

To Time

4. To Time
 
Note:
Should the Absent Type be Absent or Absent - Official the To Time will be Grayed out (Inactive). The user will  not be able to enter a To Time.
 
Note:
Should the Absent Type be Early-Leaving, Late - Arrivals or Part Time the To Time will  not be Grayed out (Active). The user will be able to enter a To Time.
 
The To Time is by default  populated as 02:00 PM. The user can change the From Time by entering it from the Keyboard or can Left Click on the Increase / Decrease Buttons  ().
 
Should the user enter a To Time which is smaller than the From Time the the System will give an indication of this:
 
5

Absent Reason

5. Absent Reason
The Absent Reason is not a Required field ().  The user selects an Absent Reason by Left Clicking on the Drop Down List Box (). When this is done a list of available Absent Reasons will be displayed.
 
Example : 
 
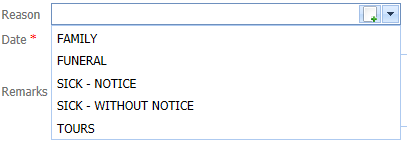
Select the applicable Absent Reason by Left Clicking on it in the list. Should the user want to enter new  Absent Reason it is done by Left Clicking on the Add Button (). When this is done the Add Absent Reasons Page will be displayed (Refer to Add Absent Reasons).
6

Remarks

6. Remarks
The user can Enter  Remarks for the Absenteeism.    
7

Select Students

7. Select Students
 
Select the students that are absent for the selected date. Setup a Filter to display the the students that should be marked absent. This can for instance be done by Grade, Class or Sports House. For this example the absenteeism for Grade 4 will be entered. When the students information are displayed Left Click on the Select Student Check Box to indicate that the selected student is absent. Repeat this step for all students. 
 
8

Notify

8. Notify
 
Should the students Guardians be notified of the absenteeism,  Left Click on the Notify  Check Box. When this is done the students Guardians will receive notification of the absenteeism via Email or SMS, depending what the Preferred method of communication that was selected on the Guardian Profile, Contacts and Email Tab's.
 
Note:
For the Guardians be notified of the Absenteeism the Absenteeism Check Box (Subscribed Notifications) on the Guardian Profile,  Notifications tab needs to be Checked.
Note:
Should the students Guardians be notified of the absenteeism the user does not need to Left Click both the Select Student and Notify Check Boxes. The user only needs to Left Click on the Notify Check Box. When this is done the Select Student Check Box will automatically be checked.
9

Next

9. Next
Note:
Should the user not select any Notifications to be done, thus just wanting to register the absenteeism for the students, Left Click on the Next Button (). When this is done the Process Button () will not be Grayed out but will be active. To process the absenteeism without any notifications,  Left Click on the Process Button () . Should the user go through the process of making the same selections for the absenteeism (Type, Reason and Date) the students that were previously selected to be absent for those settings will be displayed. Should the user not select an students and Left Click on the Process Button () the following Error will be displayed:
 
Note:
Should the user have selected Notifications to be done, Left Click on the Next Button (). When this is done the Daily Absenteeism - Notification Page will be displayed (Refer to Daily Absenteeism - Notification).
Made with help of Dr.Explain