Note:The Setup as displayed above will be used to create the Export File for the import into a Microsoft
Word document using Word’s Mail Merge Function.
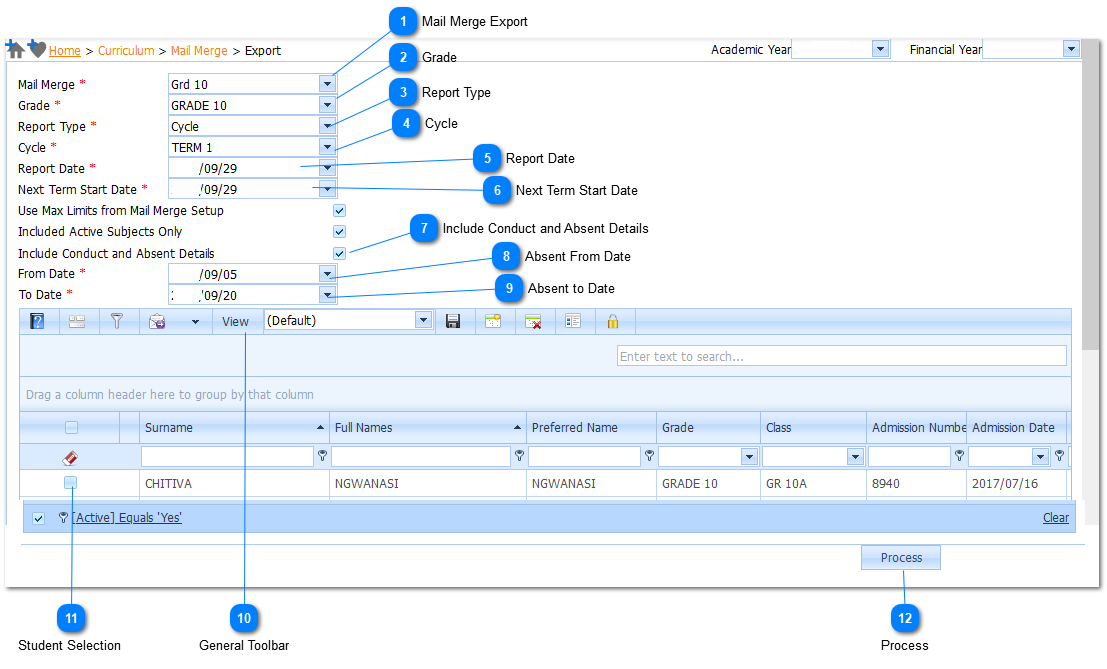
Mail Merge Export
The Mail Merge Export File is a Required field (). The user selects the Mail Merge ExportFile, by Left Clicking on the Drop Down List Box (). When this is done a list of available Mail Merge Files, that have been Created making use of the Setup Mail Merge Option, will be displayed. Select the applicable Mail Merge File by Left Clicking on it in the list. Should the user not Select a Mail Merge File and attempts to Process () the information the system will give an indication () that this is compulsory information.
The Grade isa Required field (). The user selects the Student Grade by Left Clicking on the Drop Down List Box (). When this is done a list of available Student Grades will be displayed. Should the user not Select a Student Gradeand attempts to Process () the information the system will give an indication () that this is compulsory information. Select the applicable Student Grade by Left Clicking on it in the list.
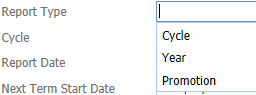
The Report Type isa Required field (). The user selects the Report Type by Left Clicking on the Drop Down List Box (). When this is done a list of available Report Types will be displayed.
Should the user not Select aReport Type and attempts to Process () the information the system will give an indication () that this is compulsory information. Select the applicable Report Typeby Left Clicking on it in the list.
Should the user select the Report Type to be Cycle - the Cycle Selection Drop Down List Box will be Active. Should the Report Type be either Year or Promotion the Cycle Selection Drop Down List Box will be In-Active. Should the Report Type be Cycle, the user selects the Cycle by Left Clicking on the Drop Down List Box (). When this is done a list of available Cycles will be displayed. Should the user not Select aCycle and attempts to Process () the information the system will give an indication () that this is compulsory information. Select the applicable Report Typeby Left Clicking on it in the list.
Note:The Report Date Field is by default populated with the current date (today). This is the date that will be exported and eventually be printed on the report card. Also known as report issue date.
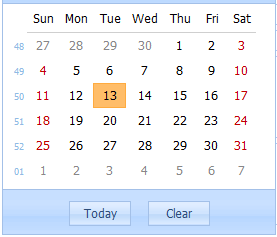
The Report Date is a Required field (). Enter the Date for the Report. Make use of the Date Picker to do this. The Date Picker is displayed by Left Clicking on the Drop Down Button (). When this is done the Date Picker will be displayed. Select the applicable date by Left Clicking on the date in the Calendar.
Should the user not Select aDate and attempts to Process () the information the system will give an indication () that this is compulsory information. Select the applicable Report Date by Left Clicking on it.
Note:The Next Term Start Date Field is by default populated with the current date (today).
The Next Term StartDate is a Required field (). Enter the Next Term StartDate for the Report. Make use of the Date Picker to do this. The Date Picker is displayed by Left Clicking on the Drop Down Button (). When this is done the Date Picker will be displayed. Select the applicable date by Left Clicking on the date in the Calendar.
Should the user not Select aNext Term Start Date and attempts to Process () the information the system will give an indication () that this is compulsory information. Select the applicable Next Term Start Dateby Left Clicking on it.
Should the user wants to Include the Number of Days that a Students were Absent, as well as the Conduct Score for the Students, in the Mail Merge Export File, the Conduct and Absent Details Check Box should be Checked. When this is done the Absent Form Date and the Absent To Date Fields will be Active and the user needs to enter Dates for these fields.
Note:This field will only be Active if the user has checked theConduct and Absent Details Check Box.
The Absent FromDate Field is by default populated with the current date (today).
The Absent From Date is a Required field (). Enter the Absent FromDate for the Report. Make use of the Date Picker to do this. The Date Picker is displayed by Left Clicking on the Drop Down Button (). When this is done the Date Picker will be displayed. Select the applicable date by Left Clicking on the date in the Calendar.
Should the user not Select an Absent FromDate and attempts to Process () the information the system will give an indication () that this is compulsory information. Select the applicable Absent FromDate by Left Clicking on it.
Note:This field will only be Active if the user has checked the Conduct and Absent Details Check
Box. The Absent To Date Field is by default populated with the current date (today).
The Absent To Date is a Required field (). Enter the Absent To Date for the Report. Make use of the Date Picker to do this. The Date Picker is displayed by Left Clicking on the Drop Down Button (). When this is done the Date Picker will be displayed. Select the applicable date by Left Clicking on the date in the Calendar.
Should the user not Select a Absent To Date and attempts to Process () the information the system will give an indication () that this is compulsory information. Select the applicable Absent To Date by Left Clicking on it.
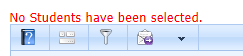
Select the Students that should be included in the Mail Merge Export by Left Clicking on the Student Selection Check Box. When this is done, a Check Mark ()will be displayed. Should the user not Select any Students and attempts to Process () the information, the system will give an indication that No Students have been selected.
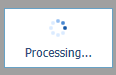
Once all Setup Information has been captured the Mail Merge Export File is Created, by Left Clicking the Process Button (). The Processing Page will be Displayed while the Export File is being Created.
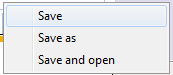
Once the Export has been completed, the user will have the Choice to Open or Save the Merge File.
Left Click the Save Button. When this is done the user will have the following options:
Select the Save as Option. When this is done the User will be able to Browse to the location where the Mail Merge File should be Saved.
Note: The File that is Created is in a CSV format. Do not Save the file in a Different Format as the
Mail Merge to Microsoft Wordonly makes use of a CSV file Format.