Menu
Index

Payment Form

Payment Form


Note:    
 
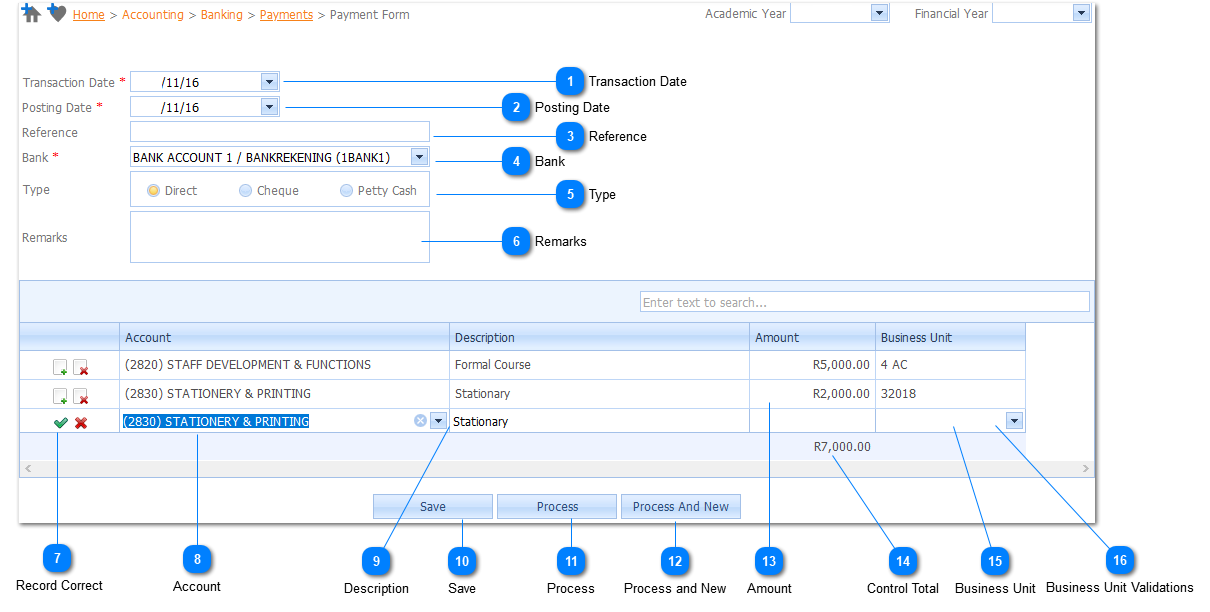
Understanding the difference between Transaction Date and Posting Date:
 
Transaction Date is typically the source document date i.e. an invoice received from a creditor may be dated 25 September 2012.
 
The Transaction Date is then entered as 2012/09/25.
 
The Posting Date may be the same or in the case above, if the Posting Date of the invoice is to be reflected in the 10th period and not the 9th period, then the Posting Date can be entered as 2012/10/05. The entry will then be posted in the period of 201210.
 
The Posting Date will determine the period of the entry.
1

Transaction Date

1. Transaction Date
 
The Transaction Date will default to today's date.
The Transaction Date is a Required field ().The user selects the Transaction Date  by Left Clicking on the Drop Down List Box (). When this is done a list of available Transaction Dates will be displayed. Should the user not Select  a Transaction Date  and attempts to Process () the information the system will give an indication  () that this is compulsory information.
1. Transaction Date
2

Posting Date

2. Posting Date
 
The Posting Date will default to today's date.
The Posting Date is a Required field ().The user selects the Posting Date  by Left Clicking on the Drop Down List Box (). When this is done a list of available Posting Dates will be displayed. Should the user not Select  a Posting Date  and attempts to Process () the information the system will give an indication  () that this is compulsory information.
2. Posting Date
3

Reference

3. Reference
 
Enter a Reference number for the Payment Entry (optional).
 
Note:    
If the field is left blank, the system will generate an automatic incremented reference number according to the format and sequence that was set up in Accounting>Setup>Document Numbers.
4

Bank

4. Bank
 
Select the bank that will be credited with this payment.
The Bank is a Required field ().The user selects the Bank by Left Clicking on the Drop Down List Box (). When this is done a list of available Banks will be displayed. Should the user not Select  a Bank  and attempts to Process () the information the system will give an indication  () that this is compulsory information.
4. Bank.
5

Type

5. Type
 
Select the Payment Type that is to be used by left clicking on the applicable type's radio button.
6

Remarks

6. Remarks
 
Enter Remarks in this field - if applicable.
7

Record Correct

7.  Record Correct
 
Left click on the Save Record button if transaction is correct and if another record (Split Payment) is to be added.
 
If this transaction consists only of one leg, then skip to Steps 13 or 14 or 15.
 
The Save Record button will be changed to Add Record button.
 
Left click on the Add Record button to add another record to this transaction.
 
Add another record by following Steps 7 to 12 above.
 
Tip:
By pressing the tab key when the Business Unit has been selected, a next record line will automatically be opened to do Split Payments (rather than clicking the Record Correct button 7.  Record Correct and then the Add Record button ).
 
 
8

Account

8. Account
 
Select the Account that is to be debited from the drop down list.
 
Note:    
Only General Ledger accounts will be listed in the dropdown list.
 
To pay a Vendor, use the Payment Transaction process as described in Accounting>Vendors>Payments.
9

Description

9. Description
 
Enter a description for the transaction.
10

Save

10. Save
 
Left click on the Save button to save the transaction without posting it. The user can then at a later stage edit / add to and post the transaction.
11

Process

11. Process
 
Left click on the Process button to post the transaction.
12

Process and New

12. Process and New
 
Left click on the Process and New button to post the transaction and open a new Payment Transaction.
13

Amount

13. Amount
 
Enter the Amount to be paid.
14

Control Total

14. Control Total
 
The Control Total will display the sum of the entries' Amounts if more than one record is entered or if the single entry is marked as correct (Refer Step 12 below).
15

Business Unit

15. Business Unit
 
Select the applicable Business Unit from the dropdown list.
16

Business Unit Validations

16. Business Unit Validations
Once Business Units have been added to the system all Transactions will flag the Business Lookups as required.
 
NB!! Business units used as Parents will not be available in the lookups, only the Sub business units (Child Business Units).


Made with help of Dr.Explain