Menu
Index

Add Address

Add Address
1

Type

1. Type
 
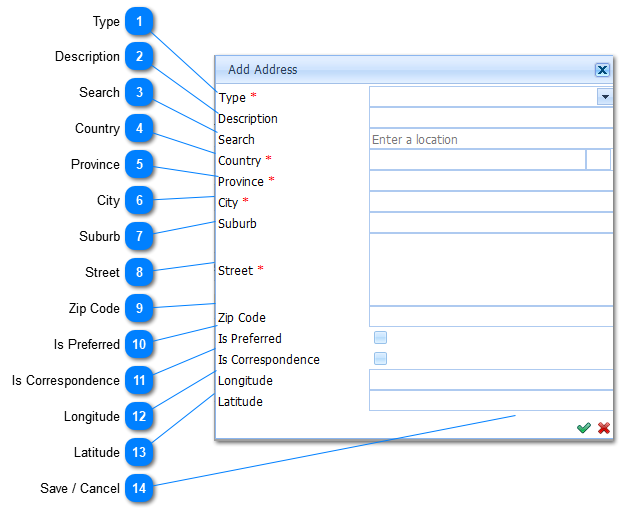
The Address Type is a Required field ().  The user selects the Address Type by Left Clicking on the Drop Down List Box () . When this is done a list of available Address Types will be displayed.
Example :
 
 The user needs to select an Address Type. Should the user not select an Address Type and attempts to Save () the information the system will give an indication  () that this is compulsory information.
 
 
Select the applicable Address Type by Left Clicking on it in the list.
2

Description

2. Description
 
Enter a Description for the Address.
3

Search

3. Search
 
Refer to Address Panels.
 
4

Country

4. Country
The Country is a Required field ().  The user selects the Country by Left Clicking on the Drop Down List Box (). When this is done a list of available Countries will be displayed.
 
Example : 
 
Select the applicable Country by Left Clicking on it in the list. Should the user want to enter a New Country it is done by Left Clicking on the Add  Button (). When this is done the  Add Country Page will be displayed (Refer to Add Country). Should the user not enter a Country and attempts to Save () the information the system will give an indication () that this is compulsory information.
 
5

Province

5. Province
 
The Province is a Required field ().  The user selects the Province by Left Clicking on the Drop Down List Box (). When this is done a list of available Provinces will be displayed.
 
Example : 
 
Select the applicable Province by Left Clicking on it in the list. Should the user want to enter a New Province it is done by Left Clicking on the Add  Button (). When this is done the Add Province Page will be displayed (Refer to Add Province). Should the user not enter a Province and attempts to Save () the information the system will give an indication () that this compulsory information.
 
6

City

6. City
 
The City is a Required field ().  The user selects the City by Left Clicking on the Drop Down List Box (). When this is done a list of available Cities will be displayed.
 
Example : 
 
Select the applicable City by Left Clicking on it in the list. Should the user want to enter a New City it is done by Left Clicking on the Add  Button (). When this is done the Add City Page will be displayed (Refer to Add City ). Should the user not enter a City and attempts to Save () the information the system will give an indication () that this compulsory information.
 
 
7

Suburb

7. Suburb
 
The Suburb is not a Required field ().  The user selects the Suburb by Left Clicking on the Drop Down List Box () . When this is done a list of available Suburbs will be displayed.
 
Example : 
 
Select the applicable Suburb by Left Clicking on it in the list. Should the user want to enter a New Suburb it is done by Left Clicking on the Add  Button (). When this is done the Add Suburb Page will be displayed (Refer to Add Suburb ).
 
8

Street

8. Street
 
The Street is a Required field ().  The user needs to enter a Street Name. Should the user not enter a Street Name and attempts to Save () the information the system will give an indication () that this compulsory information.
 
9

Zip Code

9. Zip Code
 
Enter the Zip Code.
10

Is Preferred

10. Is Preferred
 
If the address that is entered is the Postal Address Left Click the Is Postal Check Box. When this is done the Check Box will display a Check mark (). This address will be printed on statements etc.
11

Is Correspondence

11. Is Correspondence
If the address that is entered is the Postal Address. Left Click the Is Correspondence Check box. When this is done the Check Box will display a Check mark (). This address will be printed on statements and used for all forms of correspondence.
12

Longitude

12. Longitude
 
Enter Longitude coordinates for GPS.
13

Latitude

13. Latitude
 
Enter Latitude coordinates for GPS.
14

Save / Cancel

14. Save / Cancel
When all information has been entered the Address is saved by Left Clicking on the Save Button (). Should the user want to Cancel the Add Action, Left Click on the Cancel Button ().
Made with help of Dr.Explain