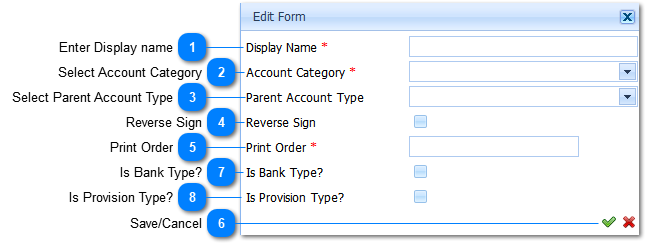
Menu
Index

Add Account Type

Add Account Type
1

Enter Display name

1. Enter Display name
 
Enter the Display Name of the Account Type.
 
 
The Display Name is a Required field ().The user is required to Enter a Display Name for the corresponding new Account Type. Should the user not Enter  a Display Name and attempt to Save () the information the system will give an indication  () that this is compulsory information.
2

Select Account Category

2. Select Account Category
 
Select the applicable Account Category by Left Clicking on it in the list.
 
The Account Category is a Required field ().The user selects the Account Category by Left Clicking on the Drop Down List Box (). When this is done a list of available Account Categories will be displayed. Should the user not Select  a  Account Category and attempts to Save () the information the system will give an indication  () that this is compulsory information.
 
3

Select Parent Account Type

3. Select Parent Account Type
 
If the Account Type is a sub type of another Account Type, then select or add the Parent Account Type.
 
The user selects the Parent Account Type by Left Clicking on the Drop Down List Box (). When this is done a list of available Types will be displayed.
Select the applicable Account Type by Left Clicking on it in the list. Should the user want to enter a New Account Type, it is done by Left Clicking on the Add  Button (). When this is done the Add Account Type Page will be displayed (Refer to Add Account Type).
 
4

Reverse Sign

4. Reverse Sign
 
This field is for future use and is Not Applicable and inactive.
 
5

Print Order

5. Print Order
The Print Order field is used to define the order in which Accounts will be printed when the Trial Balance is printed.
 
The Print Order is a Required field ().The user is required to Enter a Print Order for the corresponding new Account Type. Should the user not Enter  a Print Order and attempt to Save () the information the system will give an indication  () that this is compulsory information.
 
6

Save/Cancel

6. Save/Cancel
When all information has been entered the Account Type is saved by Left Clicking on the Save Button (). Should the user want to Cancel the Add Action, Left Click on the Cancel Button ().
7

Is Bank Type?

7. Is Bank Type?
Left-Click this Checkbox in the case that the pertaining Account Type being added/altered is a Bank Account.
8

Is Provision Type?

8. Is Provision Type?
Left-Click this Checkbox in the case that the pertaining Account Type being added/altered is a Provisional Account Type.
Made with help of Dr.Explain