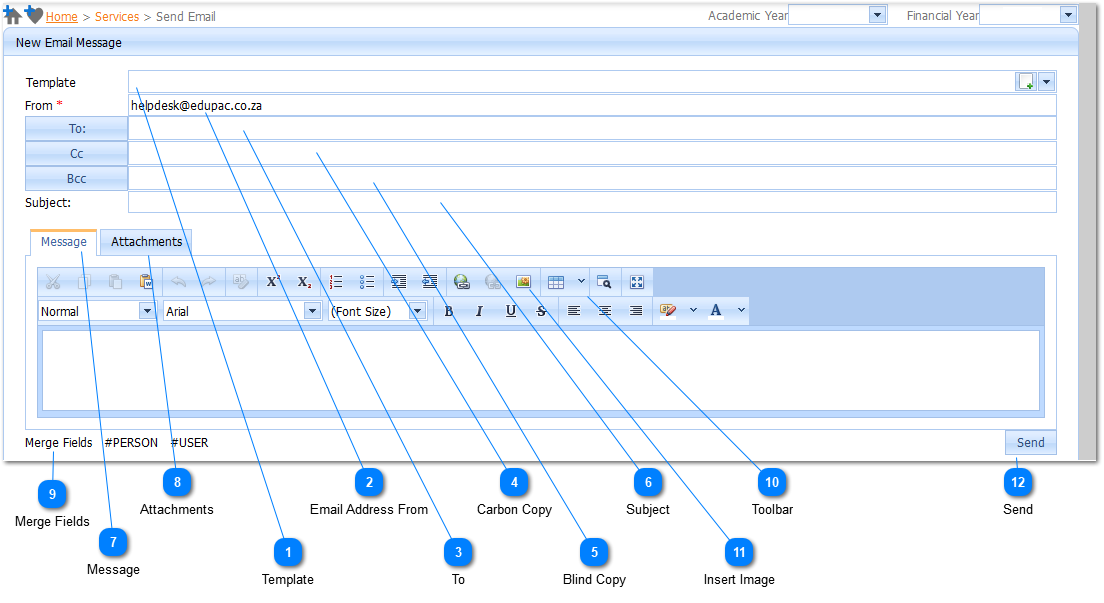
Menu
Index

Send Email

Send Email
1

Template

1. Template
The user selects the Template by Left Clicking on the Drop Down List Box (). When this is done a list of available Templates will be displayed.
 
Example : 
 
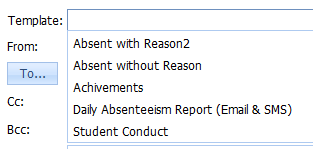
Select the applicable Template by Left Clicking on it in the list. Should the user want to enter a New Template it is done by Left Clicking on the Add Button ( ). When this is done the Add Template Type Page will be displayed (Refer to Add Template Type).
2

Email Address From

2. Email Address From
 
The Email Address FROM is a Required field ().  The user needs to enter an Email Address . Should the user not enter an Email Address and attempts to Save () the information the system will give an indication that this is compulsory information.
 
 
Note:
Should the user have entered a Preferred Email Address under Management / School Information - the Email Tab (Refer to Email), the Email address will automatically be populated with this Email Address. Should this not be the case the user can type in a Valid Email Address. Should the user not enter a Valid Email Address  the system will give an indication  () that this is an Invalid Email Address.
 
3

To

3. To
 
 
The Email Address To is a Required field ().  The user needs to Select an Email Address . Should the user not Select an Email Address and attempts to Save () the information the system will give an indication that this is compulsory information (). The user selects the Email addresses by Left Clicking on the To Button(). Refer to Add Email Addresses.
4

Carbon Copy

4. Carbon Copy
Enter additional Email addresses that should be Copied. Should the user not enter a Valid Email Address the system will give an indication  () that this is an Invalid Email Address.
 
   
5

Blind Copy

5. Blind Copy
 
Enter  additional  Email  addresses that should be Blind Copied. Should the user not enter a Valid Email Address the system will give an indication  () that this is an Invalid Email Address.
 
6

Subject

6. Subject
 
Enter a subject for the Message.
7

Message

7. Message
 
Note:
(i) Should the user only enter an Email Message in the Template, and the Template is used, only an Email message notification will be sent to the Persons that have been configured to receive Email Notifications.
 
(ii) Should the user only enter a SMS Message in the Template, and the Template is used, only a SMS message notification will be sent to the Persons that have been configured to receive SMS Notifications.
 
(iii) Should the user enter both an Email and a SMS Message,  both an Email and SMS message notifications will be sent to the Persons that have been configured to receive both Email and SMS Notifications.
 
For the creation of Email content, Refer to Creating Email Message.
 
For the creation of SMS content, Refer to Creating SMS.
 
Should the user not enter a Message the system will give an indication that Message Content is required - .
8

Attachments

8. Attachments
 
The user can Add Attachments to the Email that is sent. Refer to Add Attachments.
 
Note:
The Attachments can be a combination of Images and Documents.
9

Merge Fields

9. Merge Fields
 
There are 2 Merge Fields that can be used. 
 
Note:
The Merge Fields are entered into the content of the mail, by either typing in the field name or copying and pasting it. Merge Fields can only be used in Mail Messages.
10

Toolbar

10. Toolbar
 
The user has access to the Toolbar for creating the Email Message. This includes pasting from Word, Inserting  Images etc.
11

Insert Image

11. Insert Image
 
Refer to Insert Image.
 
12

Send

12. Send
 
When all information has been entered the Email is sent by Left Clicking on the Send Button ().
 
Made with help of Dr.Explain