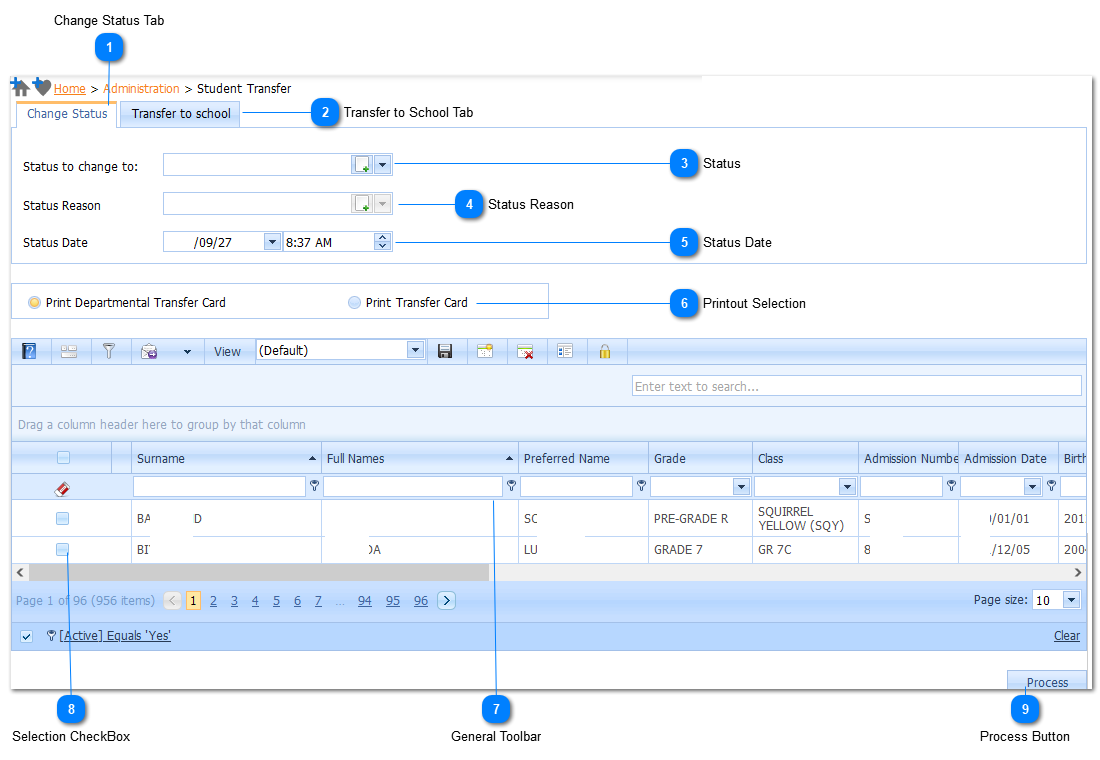
Menu
Index

Student Transfer

Student Transfer
 
 
1

Change Status Tab

1. Change Status Tab
Left-Clicking on this Tab Control will display the details pertaining to the Changing of a or Multiple Learner's Statuses. The details and options relevant will be displayed below the tab control.
2

Transfer to School Tab

2. Transfer to School Tab
Left-Clicking on this Tab Control will display the details pertaining to the Changing of a or Multiple Learner's Statuses. The details and options relevant will be displayed below the tab control.
3

Status

3. Status
Select the relevant Status Value which is to be applied to the Selected Learners below.
By Left-Clicking the New Button () a new Status Value can be created for selection. Refer to Add Statuses.
4

Status Reason

4. Status Reason
Select the relevant Status Reason pertaining to the above selected Status Value.
By Left-Clicking the New Button() a new Status Reason Value can be created for selection. Refer to Add Statuses.
5

Status Date

5. Status Date
Select the relevant Status Date Value and Status Time Value pertaining to the change of Status to be processed on Selected Learners.
6

Printout Selection

6. Printout Selection
Select either option for printing of the Status Change/School Transfer Report by Left-Clicking on the Radio Button Control ( - not Selected) OR ( - Selected).
Your Web Browser will automatically attempt to print a PDF Document once the Process Button (See Bullet 9 below) has been Left-Clicked.
7

General Toolbar

7. General Toolbar
For Adding, Editing,  Removing, Printing, Filtering etc. of Student Records,  Refer to  GENERAL TOOLBAR MODULE.
8

Selection CheckBox

8. Selection CheckBox
Select the relevant Learners in the grid by Left-Clicking on this CheckBox Control Icon.
Once a Learner has been Selected, and all relevant information above has been Selected. The Process Button (see Bullet 9) may be Left-Clicked to Process the Request.
The CheckBox Control Icon will visually change from (Unselected) to (Selected) indicating the Learner has been Selected for Processing of the Request.
By Left-Clicking the CheckBox Control Icon in the General Toolbar (See Bullet 7), all Learners will be Selected with respect to the current Filtering Parameters.
Caution is to be considered using the "Select All" CheckBox Control Icon on the General Toolbar as this will Select all Learners with respect to the current Filtering Parameters, NOT the Learners visible on the current Grid View thusly selecting these Learners for the Process Request.
9

Process Button

9. Process Button
Left-Clicking on the Process Button 9. Process Button will apply the above parameters (Bullets 1-6) to the Selected Learners (Bullet 8) with respect to the options Selected.
Once the Process Button has been clicked, a pop-up notification will display a report to be printed or saved pertaining the details of changes and the Learners Selected.
*Note*
If your browser notifies you that a pop-up window has been blocked please contact your System Administrator to resolve and ALLOW ALL POP-UPS from the Edupac Enterprise Edition as these POP-UP windows contain information relevant to the Edupac Enterprise Edition system and user.
Made with help of Dr.Explain