Menu
Index

Vulnerability

Vulnerability
1

Vulnerability Category

1. Vulnerability Category
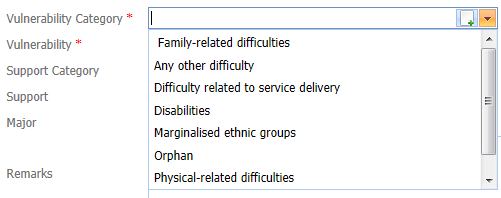
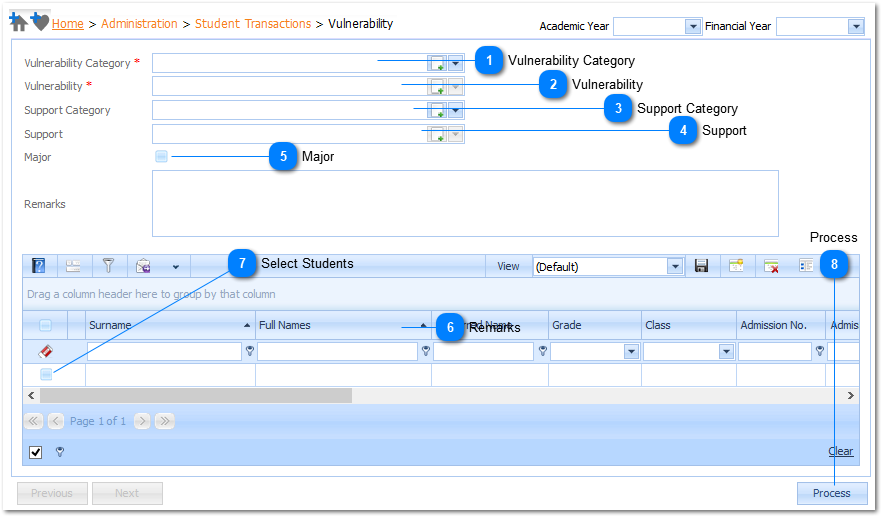
The Vulnerability Category is a Required field ().  The user selects the Vulnerability Category by Left Clicking on the Drop Down List Box (). When this is done a list of available Vulnerability Categories will be displayed.
 
Example : 
 
Select the applicable Vulnerability Category by Left Clicking on it in the list. Should the user want to enter a new  Vulnerability Category it is done by Left Clicking on the Add Button (). When this is done the Add Vulnerability Category Page will be displayed (Refer to Add Vulnerability Category). Should the user not enter a Vulnerability Category and attempts to Process the information by Left Clicking on the Process Button () the system will give an indication () that this is compulsory information.
2

Vulnerability

2. Vulnerability
Note:
The Vulnerability field is Grayed out (Inactive) when the page is opened. Once the user has selected a Vulnerability Category, the Vulnerability field will become Active, and will be  populated with the Vulnerabilities that are related to the selected Vulnerability Category.
 
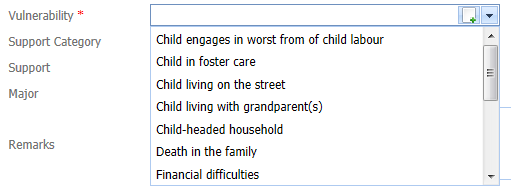
The Vulnerability is a Required field ().  The user selects the Vulnerability by Left Clicking on the Drop Down List Box (). When this is done a list of available Vulnerabilities  will be displayed.
 
Example : 
 
Select the applicable Vulnerability by Left Clicking on it in the list. Should the user want to enter a  new Vulnerability it is done by Left Clicking on the Add Button (). When this is done the Add Vulnerability Page will be displayed (Refer to Add Vulnerability ). Should the user not enter a Vulnerability and attempts to Process the information by Left Clicking on the Process Button () the system will give an indication () that this is compulsory information.
 
3

Support Category

3. Support Category
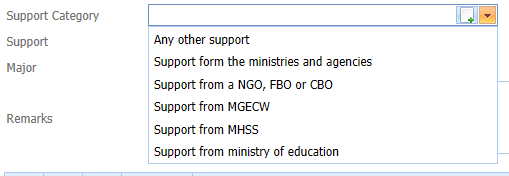
The Support Category is not a Required field ().  The user selects the Support Category by Left Clicking on the Drop Down List Box (). When this is done a list of available Support Categories will be displayed.
 
Example : 
 
Select the applicable Support Category by Left Clicking on it in the list. Should the user want to enter a new  Support Category it is done by Left Clicking on the Add Button (). When this is done the Add Support Category Page will be displayed (Refer to Add Support Category).
 
4

Support

4. Support
Note:
The Support field is Grayed out (Inactive) when the page is opened. Once the user has selected a Support Category, the Support field will become Active, and will be  populated with the Support Types that are related to the selected Support Category
 
The Support is not a Required field ().  The user selects the Support  by Left Clicking on the Drop Down List Box (). When this is done a list of available Support Types  will be displayed.
 
Example : 
 
Select the applicable Support by Left Clicking on it in the list. Should the user want to enter a new Support Type it is done by Left Clicking on the Add Button (). When this is done the Add Support Page will be displayed (Refer to Add Support).
5

Major

5. Major
A student can have more than one Vulnerability. Should this Vulnerability be the students Major Vulnerability the user sets this as the Major Vulnerability by Left Clicking on this Check Box).
6

Remarks

6. Remarks
The user can enter Remarks pertaining to this particular Vulnerability setup.
7

Select Students

7. Select Students
Select the students that should be allocated to this Vulnerability. Setup a Filter to display the the students that should  be allocated to this Vulnerability. This can for instance be done by Grade, Class or Sports House. When the students information are displayed Left Click on the Select Student Check Box to indicate that the selected student will be allocated to this Vulnerability. Repeat this step for all students. 
 
8

Process

8. Process
 
Once the student selection / allocation process has been completed the information is saved by Left Clicking the Process Button ().
Made with help of Dr.Explain