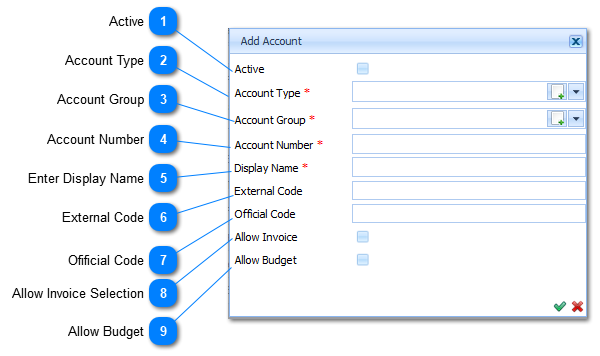
Menu
Index

Add Account

Add Account
1

Active

1. Active
 
2

Account Type

2. Account Type
 
Select the applicable Account Type that this Account belongs to by Left Clicking on it in the  Drop Down List Box (). When this is done a list of available Types will be displayed.
 
Should the user want to enter a New Account Type, it is done by Left Clicking on the Add  Button (). When this is done the Add Account Type Page will be displayed (Refer to Add Account Type).
 
 
The Account Type is a Required field ().The user selects the Account Type by Left Clicking on the Drop Down List Box (). When this is done a list of available Account Types will be displayed. Should the user not Select  a  Account Type  and attempts to Save () the information the system will give an indication  () that this is compulsory information.
 
3

Account Group

3. Account Group
 
Select the Account Group that this Account belongs to.
 
The user selects the Account Group by Left Clicking on the Drop Down List Box (). When this is done a list of available Groups will be displayed.
Select the applicable Account Group by Left Clicking on it in the list. Should the user want to enter a New Account Group, it is done by Left Clicking on the Add  Button (). When this is done the Add Account Group Page will be displayed (Refer to Add Account Group).
 
4

Account Number

4. Account Number
Enter the Account Number of the Account that is to be created.
 
It is good practice to use consistent numbering schemas.
 
For example:
 
Asset, Liability and Equity Category accounts all start with 1; i.e. 1BANK01, 1BOND03, 1VEH_01 etc.
 
Income and Expense Accounts start with 2; i.e. 2RENT, 2TELE04, 2ENTERT etc.
 
The Account Number is a Required field ().The user is required to Enter a Account Number for the corresponding new Account. Should the user not Enter  a Account Number and attempt to Save () the information the system will give an indication  () that this is compulsory information.
5

Enter Display Name

5. Enter Display Name
 
The Display Name is a Required field ().The user is required to Enter a Display Name for the corresponding new Account. Should the user not Enter  a Display Name and attempt to Save () the information the system will give an indication  () that this is compulsory information.
 
6

External Code

6. External Code
 
Typical entries will be if another system was previously used to define Account Codes , where the previous system's Code can be used in this field as a reference.
 
Any or no alpha-numeric characters can be entered.
7

Ofificial Code

7. Ofificial Code
 
8

Allow Invoice Selection

8. Allow Invoice Selection
Should invoicing be allowed against this Account, Left Click the Allow Invoice Check Box. When this is done the Check Box will display a Check mark (). Invoices can now be issued against this account.
9

Allow Budget

9. Allow Budget
Note:
This Check Box MUST be ticked to allow this Account to be dispalyed in the list of Accounts on the Budget input screen! (Refer to Budgets for budgeting process).
 
Should the user want to Budget against this Account, Left Click the Allow Invoice Check Box. When this is done the Check Box will display a Check mark (). Invoices can now be issued against this account.
Made with help of Dr.Explain