Menu
Index

Sales

Sales
 
1

General

1. General
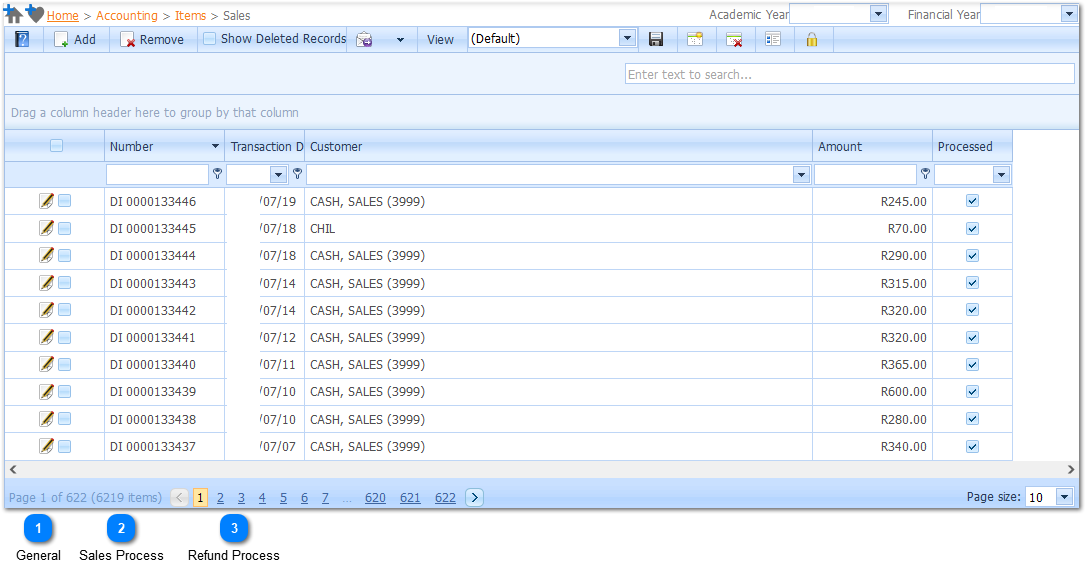
The sales screen has been created to assist Users with the “Sales Role” to sell items from the stock list. This screen has a barcode function to allow the scanning of items. The PLU (Price Look Up) or Item Code is used as the Barcode. The Customer with IsCashAccount” flag is important for this screen to allow for cash sales and automatic receipts.
 
 
2

Sales Process

2. Sales Process
Steps:
 
a)     Select the Add button.
 
 
b)     The Barcode will have focus on the sales screen.
c)     Items can now be scanned.
 
 
d)     Alternatively, the Item Lookup Code can be used.
e)     Select the area.
f)     While focus on the barcode select the “F2” key or select the Items button.
 
g)     The Items popup will be displayed.
h)     Search for the Item using the search box or the filter row.
i)     Select the Item/s.
j)     Select the Ok button.
 
k)     Once Items have been scanned or added with the Item Lookup the sale can be completed.
l)     While focus on the barcode press the “F3” key or select the Payment button.
 
 
m)     The Cash Account will be auto selected.
n)     Customer Account can be used if the Customer is buying on Account.
o)     Delivery Details and / or Other Information on the Cash Account if required.
p)     Select the Payment Type.
q)     Enter the Amount Tendered and then select the Customer and press the Enter key.
r)     Hand the Customer the change should it be applicable.
s)     Select the Process button.
 
 
t)     The Transaction will be posted.
 
u)     An Invoice Number will be allocated.
v)     Select the Print button to print the Invoice.
 
w)     Select the Next Transaction button to start a new Item Sale.
 
End Of Day:
 
x)     On the sales screen use the Cash Balancing button to Print the Cash Receipts for the day.
y)     This will assist to balance all cash received.
z)     While focus on the barcode press the “F4” key or select the Print Cash Balancing button.
 
 
aa)     Print the report and hand in with the cash.
bb)     Debtors or General Ledge Clerk then can prepare the Banking.


3

Refund Process

3. Refund Process
Steps:
 
a)     Select the Add button.
 
b)     While focus on the barcode select the “F6” key or select the Refunds button.
 
c)     The Refund screen will be displayed.
 
 
d)     The Barcode will have focus on the sales screen.
e)     Items can now be scanned.
f)     Alternatively, the Item Lookup Code can be used.
g)     Select the area.
h)     The Items popup will be displayed.
i)     Search for the Item using the search box or the filter row.
j)     Select the Item/s.
k)     Select the Ok button.
 
 
l)     Once Item(s) have been scanned or added with the Item Lookup the Refund can be completed.
m)     While focus on the barcode press the “F3” key or select the Refund button.
 
 
n)     The Cash Account will be auto selected.
o)     If the Customer Account is selected the Customer Account will be credited. If the Cash Account is used a Cash refund must be done.
p)     Delivery Details and / or Other Information on the Cash Account if required.
q)     Select the Refund Type.
r)     Select the Process button.
 
 
s)     The Transaction will be posted.
 
 
t)     An Invoice Number will be allocated.
u)     Select the Print button to print the Invoice.
 
 
v)     Select the Next Transaction button to start a new Item Sale.
 
End Of Day:
 
w)     On the sales screen use the Cash Balancing button to Print the Cash Receipts for the day.
x)     This will assist to balance all cash received.
y)     While focus on the barcode press the “F4” key or select the Print Cash Balancing button.
 
 
z)     Print the report and hand in with the cash.
aa)     Debtors or General Ledge Clerk then can prepare the Banking.


Made with help of Dr.Explain