Menu
Index

How to Capture Student Conduct per Subject Class

How to Capture Student Conduct per Subject Class
 
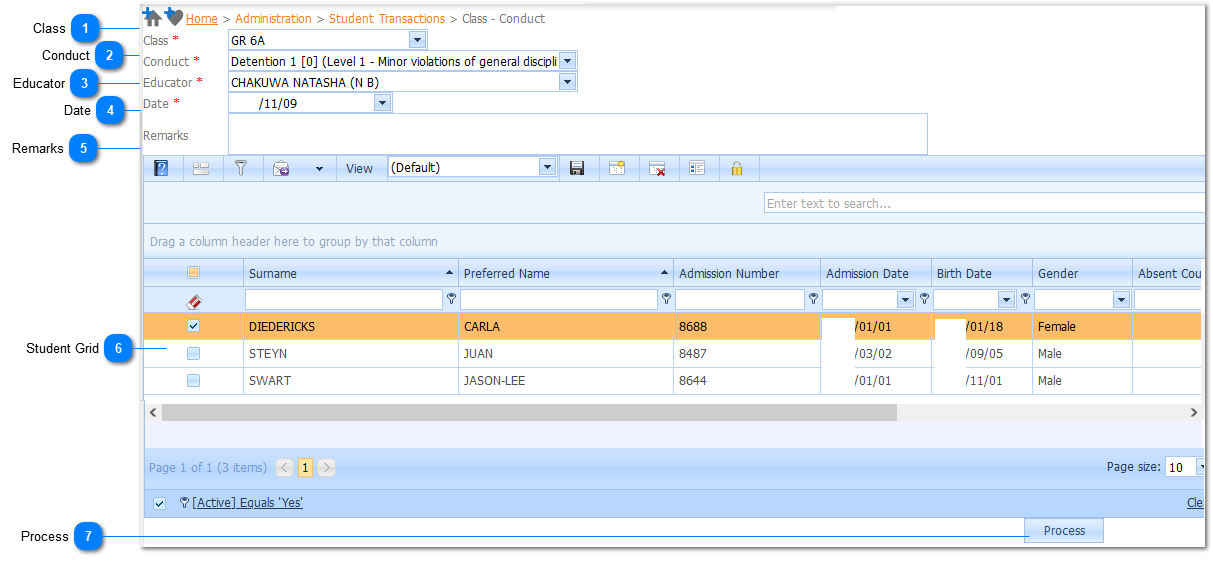
The Class - Conduct Screen allows the User to perform a Batch Conduct Entry for an Entire Class.
1

Class

1. Class
The Class is a Required field ().  The user selects the TO  Class (the Class where the students will be relocated to) by Left Clicking on the Drop Down List Box (). When this is done a list of available Classes will be displayed.
 
 
Select the applicable Class by Left Clicking on it in the list. Should the user want to enter new a Class it is done by Left Clicking on the Add Button (). When this is done the Add Class Page will be displayed (Refer to Add Classes - Read Note Below). Should the user not enter a Class and attempts to Process the information by Left Clicking on the Process Button ()the system will give an indication () that this is compulsory information.
Note:
When the Add Classes Page is displayed only the required fields will be displayed and not all the fields that are displayed when using the Add Classes Page to Add a Class.
2

Conduct

2. Conduct
Note:
The Conduct Selection Box will be Grayed out until the user has entered a Conduct Level. As soon as a Conduct Level has been entered the Conduct Selection Box will become active and the user will be able to select the Conduct.
 
The Conduct is a Required field ().  The user selects the Conduct Level by Left Clicking on the Drop Down List Box () . When this is done the list of available Conducts will be displayed.
 
Example :
 
 The user needs to select a Conduct. Should the user not select a Conduct  and Left Clicks the Next Button () to continue to the next page, the system will give an indication  () that this is compulsory information.
 
 
Select the applicable Conduct by Left Clicking on it in the list. Should the user wants to add a new  Conduct, it is done by Left Clicking on the Add  Button (). When this is done the  Add Conduct Page will be displayed (Refer to Add Conduct).
3

Educator

3. Educator
The Educator is a Required field ().  The user selects the Educator by Left Clicking on the Drop Down List Box () . When this is done a list of available Educators will be displayed.
The user needs to select an Educator. Should the user not select an Educator and Left Clicks the Next Button () to continue to the next page, the system will give an indication  () that this is compulsory information.
 
 
Select the applicable Educator by Left Clicking on the Educator in the list. Should the user want to add a new  Educator, it is done by Left Clicking on the Add  Button (). When this is done the  Add Educator Page will be displayed (Only the required fields for the Educator Profile will be requested).
4

Date

4. Date
Note:
The Date Field is by default populated with the current date (today).
 
The Date is a Required field (). Enter the Date for the Conduct. Make use of the Date Picker to do this. The Date Picker is displayed by Left Clicking on the Drop Down Button (). When this is done the Date Picker will be displayed. Select the applicable date by Left Clicking on the date in the Calendar.
 
Should the user not select a Date and Left Clicks the Next Button () to continue to the next page, the system will give an indication  () that this is compulsory information.
 
5

Remarks

5. Remarks
The user can enter Remarks for the Conduct.
6

Student Grid

6. Student Grid
Once a Learner has been Selected, and all relevant information above has been Selected. The Process Button (see Bullet 7) may be Left-Clicked to Process the Request.
The CheckBox Control Icon will visually change from (Unselected) to (Selected) indicating the Learner has been Selected for Processing of the Request.
By Left-Clicking the CheckBox Control Icon in the General Toolbar, all Learners will be Selected with respect to the current Filtering Parameters.
Caution is to be considered using the "Select All" CheckBox Control Icon on the General Toolbar as this will Select all Learners with respect to the current Filtering Parameters, NOT the Learners visible on the current Grid View thusly selecting these Learners for the Process Request.
7

Process

7. Process
Once Students have been selected the students are allocated the Conduct Records as defined above.
Made with help of Dr.Explain