Menu
Index

Add Student

Add Student
1

Add Picture

1. Add Picture
 
The user can upload a picture of the Student. Upload the Image by Left Clicking on the Browse button (Refer to Upload Student Image)
 
Note:  (a)   The following file types are supported
 
(i)      *.JPEG
(ii)      *.PNG
(iii)     *.GIF
 
(b)     The Image file size is limited to a maximum of 1 Mb.
 
Upload the Student Image by Left Clicking on the Browse button (Refer to Upload Student Image.)
2

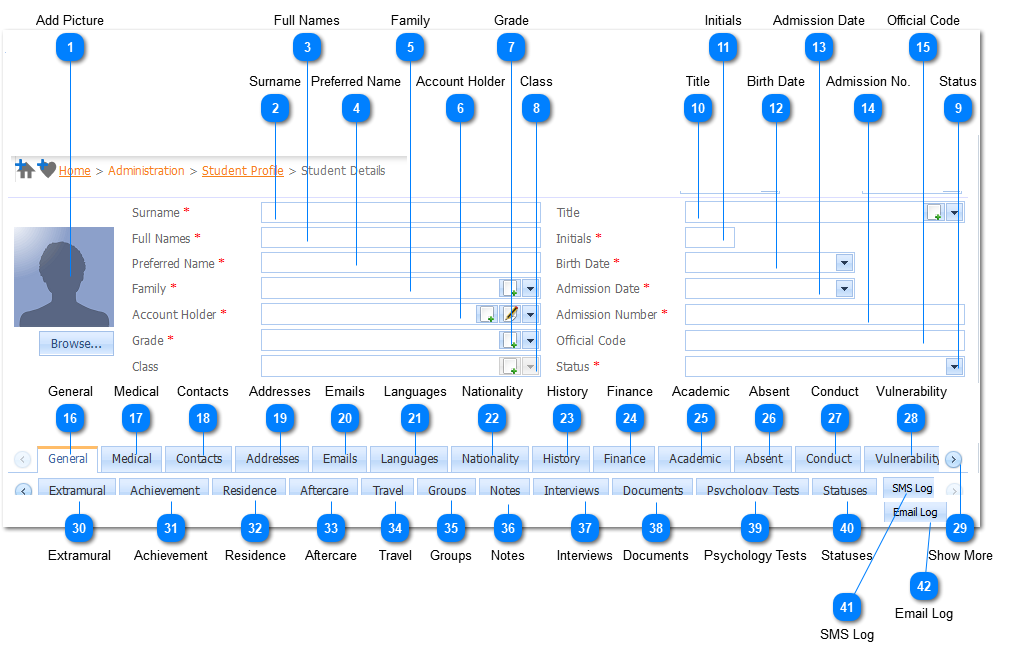
Surname

2. Surname
The Surname is a Required field ().  The user needs to enter a Surname. Should the user not enter a Surname and attempts to Save () the information the system will give an indication  () that this is compulsory information.
 
3

Full Names

3. Full Names
The Full Name is a Required field ().  The user needs to enter a Full Name. Should the user not enter a Full Name  and attempts to Save () the information the system will give an indication  () that this is compulsory information.
 
4

Preferred Name

4. Preferred Name
The Preferred Name is a Required field ().  The user needs to enter a Preferred Name. Should the user not enter a Preferred Name  and attempts to Save () the information the system will give an indication  () that this is compulsory information.
 
5

Family

5. Family
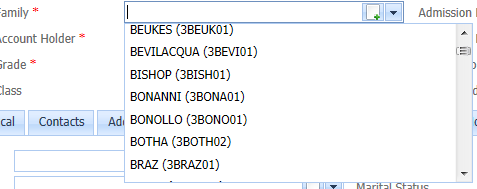
The Family is a Required field ().  The user selects the Family by Left Clicking on the Drop Down List Box . When this is done a list of available Families will be displayed.
 
Example :
 
Select the applicable Family by Left Clicking on it in the list. The user can type in the a part of the surname. With each letter that is typed in the system will filter the surnames in the list. Should the user want to enter a New Family it is done by Left Clicking on the Add  Button (). When this is done the  Add Family Page will be displayed  (Refer to Add Family). Should the user not enter a Family and attempts to Save () the information the system will give an indication () that this is compulsory information.
 
6

Account Holder

6. Account Holder
The Account Holder is a Required field ().  The user selects the Account Holder by Left Clicking on the Drop Down List Box . When this is done a list of available Account Holders will be displayed.
 
Example :
 
Select the applicable Account Holder by Left Clicking on it in the list. The user can type in the a part of the Surname. With each letter that is typed in the system will filter the Surnames in the list. Should the user want to enter a New Account Holder it is done by Left Clicking on the Add  Button (). When this is done the  Add Account Holder Page will be displayed (Refer to Add Customer Account ). Should the user not enter an Account Holder and attempts to Save () the information the system will give an indication () that this is compulsory information.
 
 
Note:  Should the user have created a Guardian and the Account Holder was created on the Guardian Profile the following could be done:
Instead of following the mentioned process above, select the Primary or Secondary Guardian on who's profile the Account Holder was created. When this is done the Account Holder information will Automatically be populated.
7

Grade

7. Grade
The Grade is a Required field ().  The user selects the Grade by Left Clicking on the Drop Down List Box . When this is done a list of available Grades will be displayed.
 
Example :
 
Select the applicable Grade by Left Clicking on it in the list. The user can type in the a part of the Grade. With each letter that is typed in the system will filter the Grades in the list. Should the user want to enter a New Grade it is done by Left Clicking on the Add  Button (). When this is done the  Add Grades Page will be displayed (Refer to Add Grades). Should the user not enter a Grade and attempts to Save () the information the system will give an indication () that this is compulsory information.
 
8

Class

8. Class
The user will not be able to enter a Class until a Grade has been entered. The Class is a Required field ().  The user selects the Class by Left Clicking on the Drop Down List Box . When this is done a list of available Class will be displayed.
 
Example :
 
Select the applicable Class by Left Clicking on it in the list. The user can type in the a part of the Class. With each letter that is typed in the system will filter the Class in the list. Should the user want to enter a New Class it is done by Left Clicking on the Add  Button (). When this is done the  Add Class Page will be displayed (Refer to Add Classes).
9

Status

9. Status
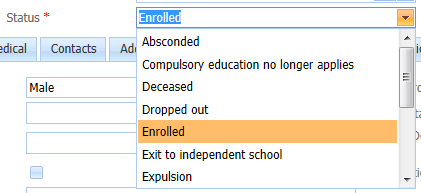
The Student Status is a Required field ().  The user selects the Student Status by Left Clicking on the Drop Down List Box . When this is done a list of available Student Statuses will be displayed.
 
Example :
 
To Add/Change Student Status records - Refer to Person Status. Select the applicable Student Status by Left Clicking on it in the list. The user can type in the a part of the Student Status. With each letter that is typed in the system will filter the Student Statuses in the list. Should the user not enter a Student Status and attempts to Save () the information the system will give an indication () that this is compulsory information.
 
10

Title

10. Title
The user selects the Title by Left Clicking on the Drop Down List Box (). When this is done a list of available Title's will be displayed.
 
Example : 
 
Select the applicable Title by Left Clicking on it in the list. Should the user want to enter a new  Title it is done by Left Clicking on the Add Button (). When this is done the Add Title Page will be displayed (Refer to Add Title).
11

Initials

11. Initials
The Initials is a Required field ().  The user needs to enter Initials. Should the user not enter Initials and attempts to Save () the information the system will give an indication  () that this is compulsory information.
 
12

Birth Date

12. Birth Date
The Birth Date is a Required field ().  The user needs to enter a Birth Date. Should the user not a enter Birth Date and attempts to Save () the information the system will give an indication  () that this is compulsory information.
 
Make use of the Date Picker to enter the Birth Date. The Date Picker is displayed by Left Clicking on the Drop Down Button (). When this is done the Date Picker will be displayed. Select the applicable date by Left Clicking on the date in the Calendar.
 
13

Admission Date

13. Admission Date
The Admission Date is a Required field ().  The user needs to enter an Admission Date. Should the user not a enter an Admission Date and attempts to Save () the information the system will give an indication  () that this is compulsory information.
 
Make use of the Date Picker to enter the Admission Date. The Date Picker is displayed by Left Clicking on the Drop Down Button (). When this is done the Date Picker will be displayed. Select the applicable date by Left Clicking on the date in the Calendar.
 
14

Admission No.

14. Admission No.
 
The Admission Number is a Required field ().  The user needs to an Admission Number. Should the user not enter an Admission Number  and attempts to Save () the information the system will give an indication  () that this is compulsory information.
 
15

Official Code

15. Official Code
 
This is the Official Code that is issued to each student by the Department of Education.
16

General

16. General
Refer to General
17

Medical

17. Medical
Refer to Medical
18

Contacts

18. Contacts
Refer to Contacts
19

Addresses

19. Addresses
Refer to Addresses
20

Emails

20. Emails
Refer to Emails
21

Languages

21. Languages
Refer to Languages
22

Nationality

22. Nationality
Refer to Nationality
23

History

23. History
Refer to History
24

Finance

24. Finance
Refer to Finance
25

Academic

25. Academic
Refer to Academic
26

Absent

26. Absent
Refer to Absent
27

Conduct

27. Conduct
Refer to Conduct
28

Vulnerability

28. Vulnerability
Refer to Vulnerability
29

Show More

29. Show More
Click this to see more tabs
30

Extramural

30. Extramural
Refer to Extramural
31

Achievement

31. Achievement
Refer to Achievement
32

Residence

32. Residence
Refer to Residence
33

Aftercare

33. Aftercare
Refer to Aftercare
34

Travel

34. Travel
Refer to Travel
35

Groups

35. Groups
Refer to Groups
36

Notes

36. Notes
Refer to Notes
37

Interviews

37. Interviews
Refer to Interviews
38

Documents

38. Documents
Refer to Documents
39

Psychology Tests

39. Psychology Tests
Refer to Psychology Test
40

Statuses

40. Statuses
Refer to Statuses
41

SMS Log

41. SMS Log
 
Refer to
42

Email Log

42. Email Log
 
Refer to
Made with help of Dr.Explain